Remove Sensitive Info from PDFs with Redaction

Philip Blog, PDFpen, PDFpen Tips

One side effect of the Affordable Care Act is an increase in dependent eligibility audits for employer-sponsored health care. These audits often require you to produce the first page of your tax filing for review. The only thing an auditor may need to see is your filing status and dependent count, but there's an awful lot more on the first page of your tax return. This is where PDFpen's redaction capability can come to the rescue.

Redaction removes sensitive information from a PDF file and replaces it with a blank area or a black box. 

Some folks try to achieve redaction by using the rectangle tool to draw a filled black box over sensitive text. When this is done, a reader of your PDF can remove the rectangle and see the text underneath. Also, when someone searches the PDF, the sensitive information will be available in the search.

There are two ways you can redact with PDFpen:

1. Redacting selected text:

  • Choose Tools -> Select Text Tool from the menu
  • Select the text you wish to redact: for example, your social security number
  • Choose Format -> Redact Text – Block

2. Redacting a whole area of a document:

  • Choose Tools -> Select Rectangle Tool from the menu
  • Select the text you wish to redact: for example, all of the numbers and tax calculations beneath the exemptions section
  • Choose Format -> Redact Text – Block

Here's what a sample redacted tax return looks like:
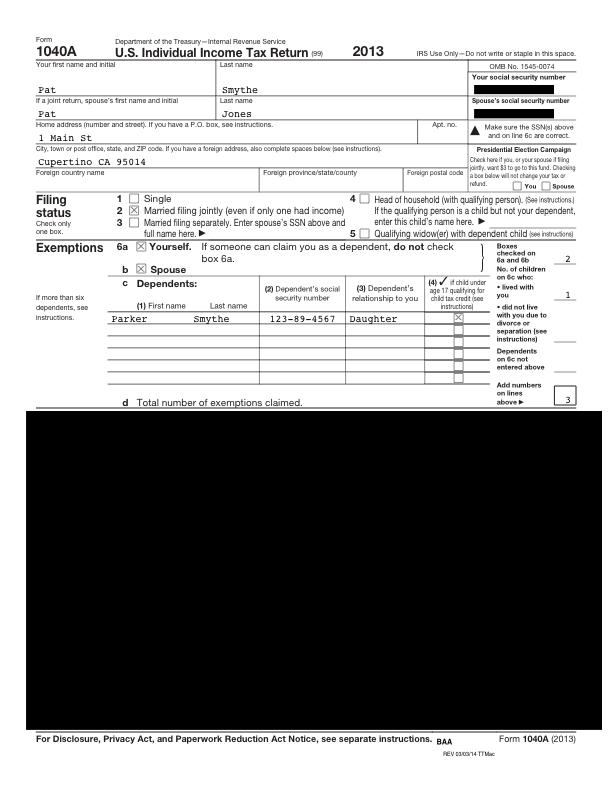
Notes:

  • PDFpen cannot remove line drawing elements, for example the lines that make up a table or border. If you use option #2 with Redact Text – Erase, you'll still see lines. Rest assured, any text and graphics have been removed.
  • The File -> Revert To command, available only if you use version saving, can be used to get back to a non-redacted version of a PDF on your computer. If you have a shared computer and would like to prevent this, when you're done redacting: choose File -> Duplicate to save the redacted version, then delete the original. This is not a necessary step to protect yourself when emailing the PDF, as file versioning is entirely local and accessible only on your computer.
Currency Conversion with TextExpander

Philip Blog, TextExpander, TextExpander Tips

Adrian Boioglu asked on Twitter:

We’ll need four things to make a currency conversion snippet:

1. Exchange Rate Data Service

OpenExchangeRates.org offers several paid levels of service and a free service limited to 1,000 queries per month. Sign up for one of those, and make note of your API key. You’ll need that later.

2. An app to process the service results

Download the free JSON Helper for AppleScript from the Mac App Store.

3. An AppleScript snippet for TextExpander

  1. Choose File -> New Snippet
  2. Set the Content: popup above the snippet editor to: AppleScript
  3. Copy and paste the AppleScript, which appears with a light gray background below, into the snippet editor
  4. Change the XXXXXXXXXXXXXXXXXXXXXXXXXXXXXXXX to your API key from step #1
  5. Set your abbreviation to: convert_to_euros

set openExchnageRatesAppID to “XXXXXXXXXXXXXXXXXXXXXXXXXXXXXXXX”

set baseCurrency to “USD”

set baseAmount to (the clipboard as string)


— Test the input

if (first character of baseAmount is not number) then

set baseAmount to (characters 2 thru ((length of baseAmount) – 1) of baseAmount) as string

end if

try

set baseAmount to baseAmount as number

on error

set baseAmount to 0

end try

if baseAmount is 0 then

return “Problem with clipboard content. Use a number or a number preceded by a currency symbol.”

end if


— Get the exchange rate; change |EUR| to another currency for different exchange rates

tell application “JSON Helper”

set theURL to “http://openexchangerates.org/api/latest.json?app_id=” & openExchnageRatesAppID & “&base=” & baseCurrency

set jsonResult to fetch JSON from theURL

set exchangeRates to rates of jsonResult

set convertedAmount to (|EUR| of exchangeRates) * baseAmount

return roundToDecimal(convertedAmount, 2) of me

end tell


on roundToDecimal(numberToRound, precision)

set multiplier to 10 ^ precision

numberToRound * multiplier

round result

return result / multiplier

end roundToDecimal


4. A plain text snippet to format the result

  1. Choose File -> New Snippet
  2. Copy and paste the following into the snippet editor:
    (€%snippet:convert_to_euros%)
  3. Set your abbreviation to “ineuros”

Test it out

Copy this dollar amount to the clipboard, then type a space followed by: ineuros

$34.95

Your result will depend on the current exchange rate but should be approximately:

$34.95 (€26.07)

Notes

To change the base currency, change “USD” in the second line of the AppleScript snippet from step 3 to another currency, such as “JPY” for Japanese Yen.

To change the target currency, change “|EUR|” about 2/3 down the script to another currency, such as “|MXN|” for the Mexican Peso.

AppleScript’s localized number handling is somewhat limited, so you may need to customize the script if you use a decimal separator other than ‘.’ or place your currency symbol at the end instead of the beginning.

Here is the list of currencies supported by OpenExchangeRate.org.


Tips on Shared Snippet Groups

Philip Blog, TextExpander, TextExpander Tips

Do you share a snippet group with a few other folks, a team, or an office?

If you don’t but would like to, you can set that up by hosting the group on your server, or even in a public Dropbox folder. You can find the exact steps here.

Here are a few tips on what makes a good shared group.

The Rules for Good Abbreviations Still Apply

Make abbreviations:

  • short
  • easy to remember
  • unique
  • unlikely to be typed by accident

But, you have the added difficulty of not knowing what abbreviations the team already has in their other groups, so making them extra unique is a plus. One way to avoid snippet conflicts is to use a naming strategy, for example, putting the same prefix onto each snippet in the group.

,,email

,,phone

Or

//email

//phone

Alternate Abbreviations

If a team member doesn’t want to use the given abbreviation, there is the option of setting up a new snippet to expand the content of the old one but use its own unique abbreviation.

Create a nested snippet:

  1. Make a new snippet and set the abbreviation to whatever you like.
  2. For the snippet content, from the Insert menu (cursor button), located just above the Abbreviation menu, click on Snippet and then locate the old snippet.
    Alternately, if you know the snippet’s abbreviation you can just type the nested snippet syntax:

%snippet:{snippet name}%

Where {snippet name} is the abbreviation of the original referenced snippet.

You now have a snippet with a unique abbreviation, who’s content is pulled directly from another snippet.

Snippet 1

abbreviation: ,,email
content: company@email.com

Snippet 2

abbreviation: em1
content: %snippet:,,email%

Non-expanding Snippets

If the shared group’s snippets do interfere with personal snippets, try making alternate abbreviations for them as explained above and then prevent the original group from expanding with the original abbreviations.

Prevent a Group from Expanding:

  1. Click on the snippet group, the Group Settings will appear to the right.
  2. Set the “Expand in:” menu to “No applications (disabled).”

Good “Label” -ing

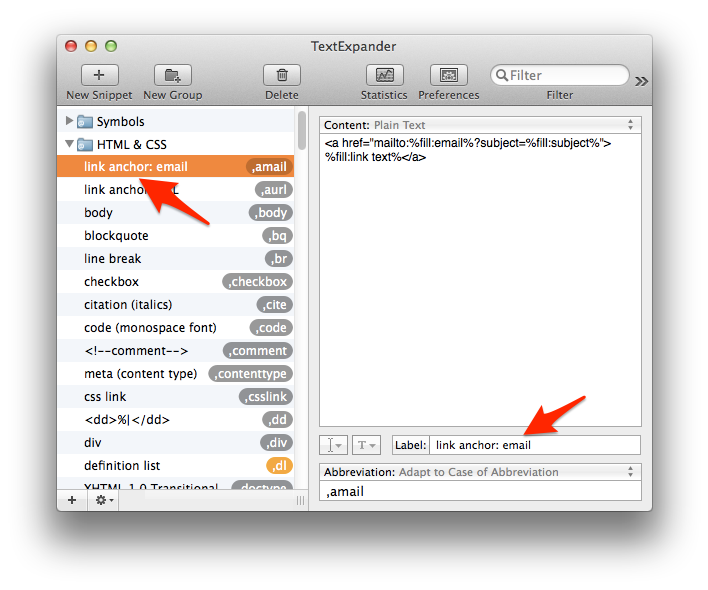
Each snippet consists of an abbreviation, the content it expands into, and a label, which is optional. If the abbreviation is not self-explanatory, and the content is too long to read at a glance, it will be hard to remember what the snippet does. Having a clear and brief label will help with that. The label is searchable, just like the abbreviation and content, so this is a good place for a search term that is not already in the snippet.

Use labels

More Snippet Explanation

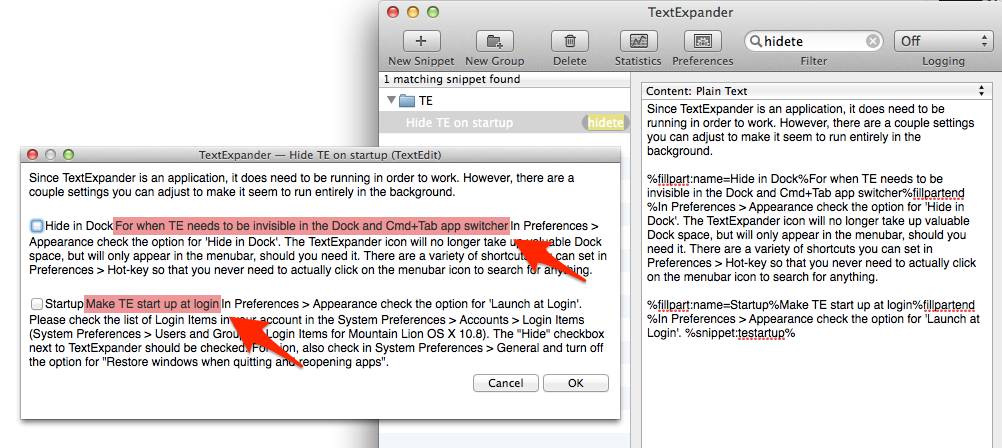
If the label isn’t quite enough to explain the snippet, or all the parts of a multi-part snippet, you can use optional sections.

An optional section is a type of fill-in where you you have text in the snippet content, but you choose whether it expands with the snippet on a case by case basis.

In this specific case you would turn off “Include by default.”

When a user expands the snippet, they will see the extra text in the temporary expansion window, but it won’t expand with the rest of the snippet.

Use optional fields

Have any tips or tricks of your own? Let us know!


A Few Snippets More

Philip Blog, TextExpander Tips

We love us some snippets. Here are a few handy little snippet ideas to make your life just a little easier.

The following snippets work best when they can expand next to any character. Click on whichever group you place them in, and the Group Settings will appear to the right. Choose “Any Character” from the “Expand after:” popup menu.

Plain Text

Ever copy text and paste it into some sort of WYSIWYG editor, then post, or email, only to find out later all the font is different? The next time you paste some text, expand this snippet instead. It converts anything copied to the clipboard to plain text before it expands.

Abbreviation: ppt

Content: %clipboard

Label: Paste in plain text

Set the “Abbreviation:” menu to “Ignore case”

Set the “Content:” menu to “Plain Text”

The abbreviation can be whatever you want, that’s just a suggestion.

Capital “I”

While TextExpander settings can capitalize the start of a sentence (Preferences > Options), the lone letter “i” can appear anywhere in a sentence and it also needs capitalizing. This snippet uses spaces as part of the abbreviation so the flow of your typing doesn't need to change at all. The { } curly brackets are not meant to be in the snippet, they indicate instructions on what to type.

Abbreviation: {space}{lower case “i”}{space}

Content: {space}{upper case “I”}{space}

Label: Capitalize “I”

Set the “Abbreviation:” menu to “Ignore case”

Set the “Content:” menu to “Plain Text”

Space Between Sentences

For the writers, if you can’t re-train yourself to use Period-Space between sentences instead of Period-Space-Space, here’s a snippet to convert it for you.

Abbreviation: {period}{space}{space}

Content: {period}{space}

Label: Period Space

Set the “Abbreviation:” menu to “Ignore case”

Set the “Content:” menu to “Plain Text”

Open URL in Chrome

Usually for Flash, but you may have other reasons to want to view your currently open Safari tab in the Chrome browser. Since this is an AppleScript snippet it does not require you to be in a text field when you type it.

Abbreviation: cchrome

Content:

property theURL : ""
tell application "Safari"
	set theURL to URL of current tab of window 1
end tell
if appIsRunning("Google Chrome") then
	tell application "Google Chrome"
		make new window
		set URL of active tab of window 0 to theURL
		activate
	end tell
else
	tell application "Google Chrome"
		do shell script "open -a \"Google Chrome\""
		set URL of active tab of window 0 to theURL
		activate
	end tell
end if

on appIsRunning(appName)
	tell application "System Events" to (name of processes) contains appName
end appIsRunning

Label: Open URL in Chrome

Set the “Abbreviation:” menu to “Ignore case”

Set the “Content:” menu to “AppleScript”


You can find a group with all of these snippets for download here.

If you have any handy snippets you want to share, let us know.