Using URL Schemes with PDFpen for iPad and PDFpen for iPhone

Philip Blog, iPhone, PDFpen Tips

The desire for Automation in the iOS-sphere by hungry power users is strong. To feed your hunger, several months ago we added support for custom URL schemes to PDFpen for iPad and PDFpen for iPhone. 

If you are not familiar, a URL scheme allows an action in an app on your iPhone from within another app. It's what allows you to tap on a street address on a website, or in an email, and have the Maps app open and show you that address. If you are interested in learning more, there's a nice intro article over at MacStories on automating Drafts.

What does this mean in terms of PDFpen on iOS? As part of some URL action, you can open a specific document you have in PDFpen, or even open to a specific page. This means you can open documents in Dropbox too, since PDFpen allows you to sync specific Dropbox folders.

Here are the details you need to use PDFpen's custom URL scheme.

Open the PDFpen app.

pdfpen://

Open a document, named “Panther”, stored locally in the main Documents view.

pdfpen:///Panther.pdf
  • Three slashes /// are used for locally stored files.
  • The file name is case sensitive.
  • A file extension is needed along with the file name. This will usually be “.pdf”.
  • When used with an invalid file name this will just open the app.

Open a document, named “Panther,” to a specific page, page 3.

pdfpen:///Panther.pdf?pg=3
  • Append “?pg=” and the page number.

Open a document, named “Leopard”, stored locally in a folder named “Big Cats.”

pdfpen:///Big%20Cats/Leopard.pdf

Open a document, named “Grey Wolf,” in a Dropbox synced folder named “Wolves.”

pdfpen://Dropbox/Wolves/Grey%20Wolf.pdf
  • Use two slashes // with files not stored locally.

For sub-folders, extend the file path to include them.

pdfpen://Dropbox/Wolves/Habitat/Tundra.pdf

We hope the PDFpen URL scheme helps bring a new level of power to your iOS automation efforts. If you have a clever workflow you'd like to share, please write us and let us know.
SmileWorthy: BBEdit

Philip Blog, Smileworthy

BBEdit, from Rhode Island-based Bare Bones, is a Smile favorite. Here's why.

Éric says: “I love BBEdit because it’s an editor that's powerful enough to do serious work and quickly zip through multi-MB files, yet simple and friendly enough to serve as a TextEdit replacement when I just need to jot down a few quick notes.”

Maia adds: “I use BBEdit to update live web pages, and I love how I can open, edit, and save files right on the server. I've also been saved by the predictive auto-fill. While I use TextExpander for my most frequently used HTML tags, BBEdit is great for ones I use less often, ones I can’t always remember, or ones which have several variations to choose from.”

Mike continues: “I love BBEdit because it helps me see what I am doing. I can quickly twist down tags to ensure that I am viewing the HTML code that I want to edit. This simple feature has saved me hours of time trying to hunt down a missing tag that resulted in a malformed HTML page.

I have also started to care more about HTML code. I indent and comment now more than I ever have before. I remove extraneous code because I know it is extraneous and it now bothers me to leave it in. When I used WYSIWYG editors, I made changes until the HTML page worked. With BBEdit, I make changes until the HTML page is right.

…and the auto-save document feature has saved me numerous times.”

Philip notes: “I love BBEdit for it’s highly expressive find-replace. Nothing else like it.”

Greg concludes: “I love BBEdit because it's an awesome all-purpose text editor. Any time I wish I could do something with a text file, I fire up BBEdit and either do it immediately or learn how I can get BBEdit to do it quickly and easily.”

If you do any work with text files, definitely check out BBEdit. It'll make you smile.


Using TextExpander Date and Time Math

Philip Blog, TextExpander Tips

Let's say it's your job to remind people to do something. Maybe you are the accounts receivable person, and you regularly need to remind people to pay you in 15 days. If you use TextExpander, your days of looking at the calendar and calculating that date are over! You can create a snippet that automatically inserts a date that is 15 days from today. Here's how:

  1. Create a new snippet by clicking on the plus (+) button in the upper left of the TextExpander window.
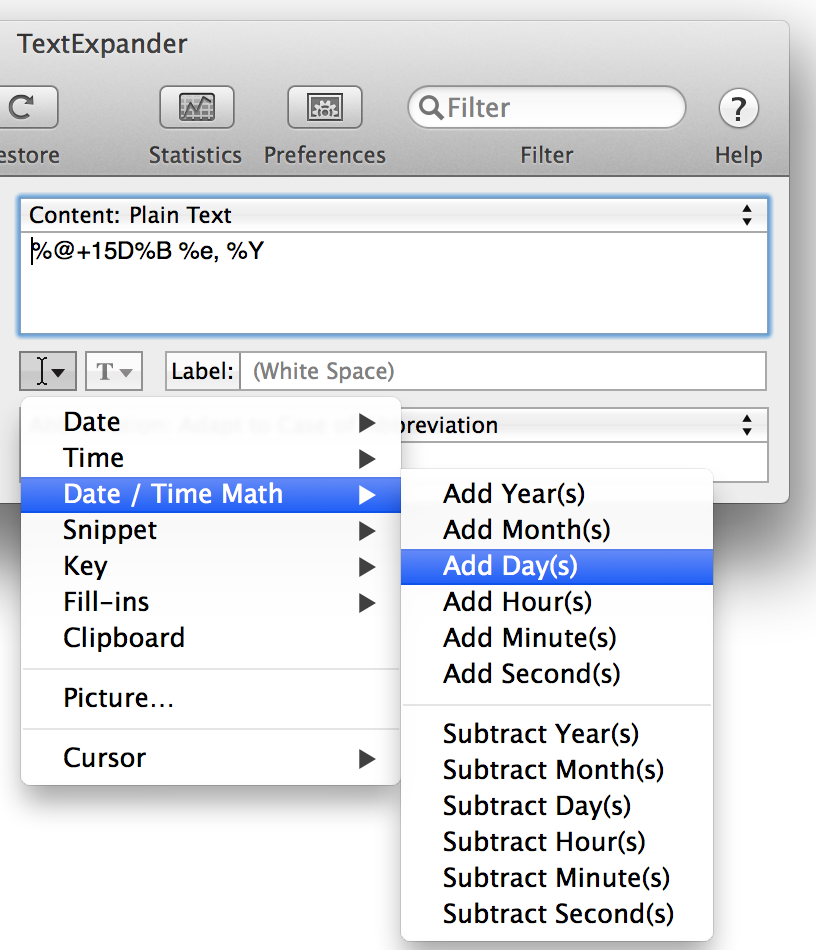
  2. Open the Insert menu by clicking on the cursor button located just above the snippet’s Abbreviation pane. Choose Date / Time Math > Add Day(s).
  3. TextExpander inserts %@+1D, the day math macro, into your snippet content pane. Change “1D” to “15D”.
  4. Insert the date format you wish to appear, again using the Insert menu. For example, if you want the date to appear formatted as “June 06, 2015”, insert the following:
    • Choose Date > Month: January. Add a space.
    • Choose Date > Day: 01. Add a comma and space.
    • Choose Date > Year: 2001.
  5. When you are done, the snippet content should be:  %@+15D%B %e, %Y
  6. Give your snippet an abbreviation, such as “d15” or “payupnow”.

Note that any date math macro, in this case “%@+15D”, must precede the date formatting macros, in this case “%B %e, %Y”.


Never forget a Mail attachment using TextExpander

Philip Blog, TextExpander

Do you sometimes forget to include an attachment in an email? We had a customer seeking a foolproof solution to guarantee that he wouldn’t type “attached” without also attaching a file. He was seeking a solution using another software package, but it inspired us to create the following slightly simpler solution using just TextExpander and Mail.

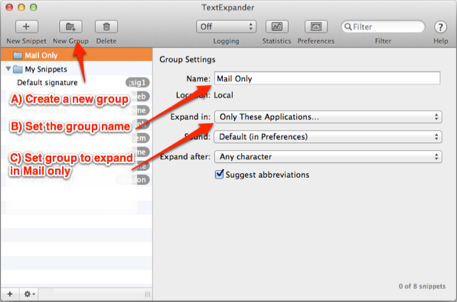
Create a Mail-only Snippet Group

Create a new snippet group and name it “Mail only”. To set a group to only expand in Mail, set the “Expand in:” menu to “Only These Applications…”, then select Mail from the list which follows.

Setup an Applet

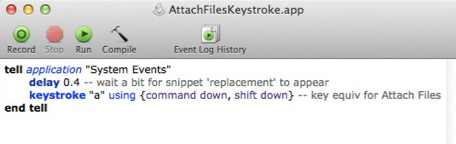
Launch the AppleScript Editor which is found in your Utilities folder and create the following script:

tell application "System Events"
    delay 0.4 -- wait a bit for snippet 'replacement' to appear
    keystroke "a" using {command down, shift down} -- key equivalent for Attach Files
end tell


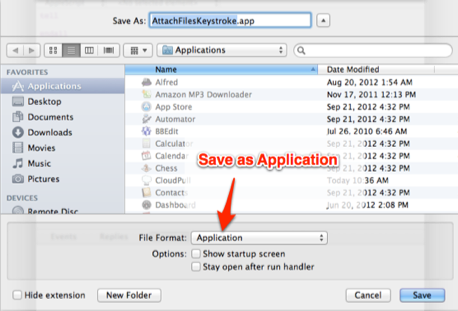
  1. Choose File -> Save…
  2. Set the filename to: AttachFilesKeystroke
  3. Save to your Applications folder:

Create a Snippet

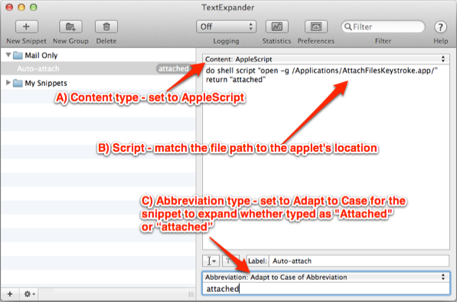
In TextExpander, create a new snippet in your “Mail only” group, and set its “Content:” type to “AppleScript”.

Insert the following text for the replacement:

do shell script “open -g /Applications/AttachFilesKeystroke.app/”
return “attached”

Finally, set the abbreviation to “attached”, and for bonus points, set the Abbreviation type to “Adapt to Case of Abbreviation” so that the snippet will work for both “Attached” and “attached.”

Now, whenever you type “attached” in Mail, you’ll hear TextExpander’s expansion sound followed by the appearance of the Attachment selection dialog. If you have already attached the file, just press the Escape key to dismiss the dialog and continue typing.

If this is too intrusive for you, you can always change the abbreviation to something like “atttach”, but then you run the risk of forgetting an attachment.

Geek Notes

The open -g shell command opens the specified item without activating the application. This allows the focus to stay in Mail.

The snippet returns the abbreviation, so this snippet doesn’t really “expand”, but the key to getting this working is having the applet start up in the background and begin taking actions after a short delay. This strategy can be adapted to begin other actions based on a snippet expansion, including telling other applications to perform actions.


Use Automator workflows with PDFpen

Philip Blog, PDFpen Tips

[Now that PDFpen 6.2.1 includes an Open Scripts Folder menu item, we've simplified the instructions below. We improved PDFpen in repsonse to writing this blog post, and we hope you like the change. Please update to 6.2.1 before proceeding.]

PDFpen 6.2 adds support for running Automator workflows from the script menu.

If you're not familiar with Automator, I'd recommend this blog post from David Sparks. It's a great example and can help you decide whether or not you'd like to learn more. Automator workflows are quite visual and more accessible to folks without a programming background than AppleScript. This post isn't meant to be a tutorial on Automator workflows. It's meant to give you an example of what you can do with one of PDFpen's newest features.

Automator already includes a number of actions which can be applied to PDFs and an even greater number of actions which can be applied to files, and your PDFs are also files. Let's dive in and create an action to apply a grid to a PDF and open it as a new document.

  1. Launch Automator, found in your Applications folder
  2. Choose File -> New
  3. Click Workflow and press Choose. Your PDF will serve as the input to your Automator workflow
  4. In the Actions tab under Library select PDFs
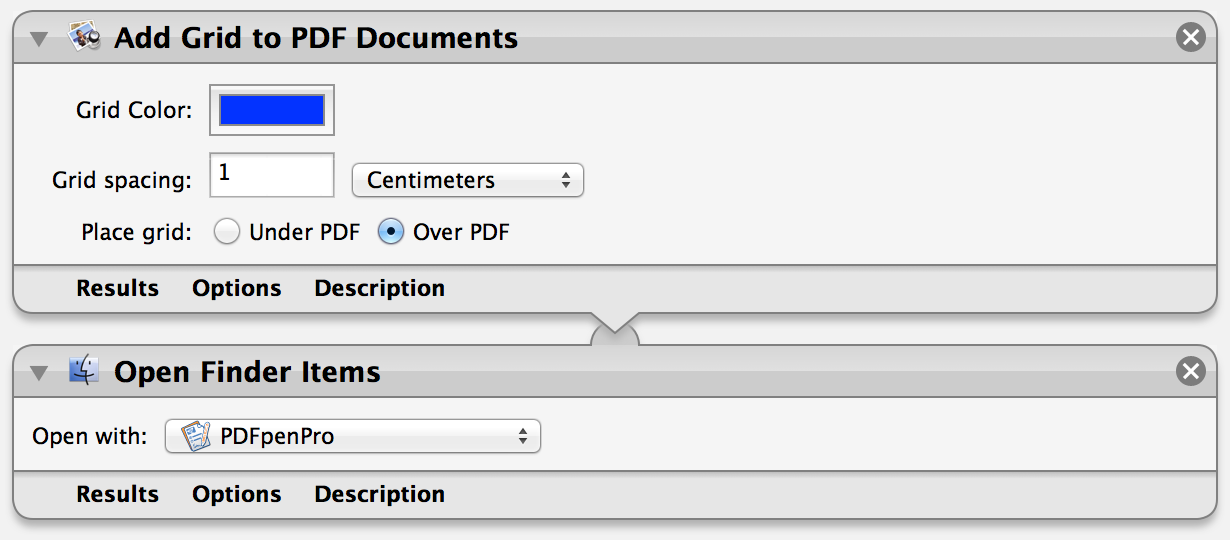
  5. Drag Add Grid to PDF Documents to the blank area to the right labeled Drag actions…
  6. Under Library, select Files & Folders
  7. Drag Open Finder Items to the actions panel
  8. If PDFpen is not your default PDF viewer, choose it from the Open with: popup
  9. Choose File -> Save…, name your workflow Add Grid and save it to the Desktop

Now, we need to move the script to the appropriate location.

  1. Choose Open Scripts Folder from the scripts menu of PDFpen
  2. Move your script from the Desktop to the folder opened in step #1
  3. Quit and re-launch PDFpen
  4. Open a PDF to which you'd like to add a grid
  5. Choose Add Grid from the script menu
  6. Now, you have a new PDF with a grid

Hopefully, this gives you a flavor of the power of Automator workflows and inspires you to investigate how you might use them in concert with PDFpen to make your work easier.

If you have a great Automator workflow you'd like to share, please let us know.