How does “Complete My Bundle” pricing work?

Philip Blog, PDFpen

This article is obsolete. “Complete My Bundle” pricing ended on February 28, 2015. It remains available for historical reference only.

Today, we're excited to release PDFpen for iPad & iPhone version 2, a universal upgrade to our existing PDFpen for iPad and PDFpen for iPhone apps. PDFpen 2 is a separate app and thus a separate purchase.

We've also released the PDFpen 2 Pack for iPad, which bundles PDFpen 2 and PDFpen for iPad; and the PDFpen 2 Pack for iPhone, which bundles PDFpen 2 and PDFpen for iPhone. These bundles allow us to simulate upgrade pricing by offering PDFpen 2 at a discount based on your prior purchase of either PDFpen for iPad or PDFpen for iPhone.

Most users of PDFpen for iPad can use “Complete My Bundle” with the PDFpen 2 Pack for iPad to upgrade for $7. That assumes you paid full price $14.99 for PDFpen for iPad. If you got PDFpen for iPad at a discount, then the “Complete My Bundle” pricing will be more. The “Complete My Bundle” pricing for the PDFpen 2 Pack for iPad is $21.99 minus whatever you paid for PDFpen for iPad.

Let's say you purchased PDFpen for iPad on sale for $9.99, your “Complete My Bundle” price is $12:
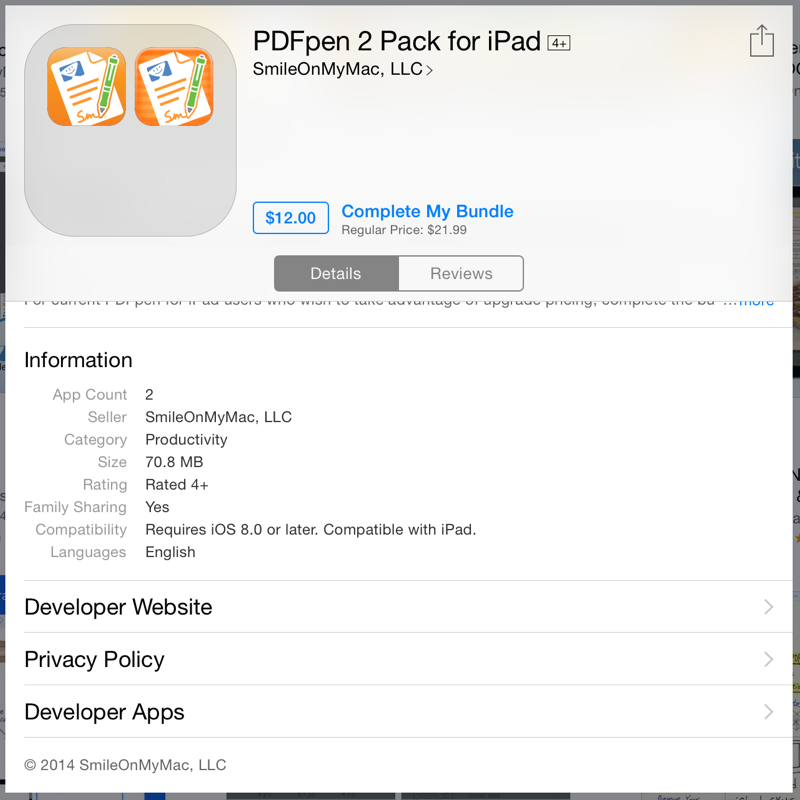
Complete My Bundle Pricing Example $12

Put simply, your “Complete My Bundle” price is the cost of the bundle minus whatever you actually paid for any components in the bundle.

We hope this clarifies the bundle pricing, and we're thrilled to be able to offer it to our existing customers.

(For another helpful take on this same issue, please see: How “Complete My Bundle” Pricing Works on the Panic Blog.)


Black Friday: TextExpander touch 3

Philip Blog, TextExpander

Black Friday 2014 has come! We're helping you celebrate by discounting one of our favorite apps, TextExpander  3 + custom keyboard.

Until Saturday you can buy it, along with several other handy apps, at Black Friday Apps. We are extending the TextExpander 3 discount all the way to Cyber Monday, but the price goes up each day so buy now!

What's TextExpander?

The typing redundancy of everyday life, sped-up, and made easy.

  • Expand custom typing shortcuts in every app on your iPad and iPhone using the TextExpander custom keyboard.
  • Sync all your snippets with TextExpander for Mac.
  • Expand multiple email signatures, form letters with customizable fill-in-the-blanks, current date and time, and more!

iCloud Drive: How to Find and Edit Files

Philip Blog, PDFpen, TextExpander

(Updated December 4, 2014 after the release of PDFpen 2.)

Yosemite (OS X 10.10) and iOS 8 bring with them iCloud Drive. This means, in addition to the iCloud storage you are familiar with, the “switch it on and it just works” sync and storage, there is also a new iCloud Drive feature in the form of a folder structure similar to Dropbox or Google Drive. This is an exciting new update which we are working to implement and understand all the details of.

If you are running Yosemite or iOS 8, access iCloud Drive by opening Finder on your Mac or opening an import / export action in an iOS app. Keep in mind, you will only see iCloud Drive in an iOS app if support for it has been added by the app’s developer.

In iCloud Drive you will notice that all the Apple apps, Numbers, Pages, Preview, etc., all have folders giving you have access to all the files in them, files made by those apps. This makes sharing files between apps much easier.

Why aren't you seeing the rest of your apps in iCloud Drive? 

All files in iCloud don't just appear in iCloud Drive. An app's files are not viewable in iCloud Drive until that app's developer adds that feature.

TextExpander 4.3.4 for Mac and TextExpander touch 3.2 do not support iCloud or iCloud Drive. We were unable to support iCloud previous to iCloud Drive, but are now working on a way to include support for iCloud Drive in the future.
 
PDFpen 6.3.2 for Mac and earlier, PDFpen 1.8.2 for iPhone and iPad and earlier, and PDFpen Scan+ 1.4 and earlier do not support iCloud Drive. iCloud still works, you can have iCloud switched on and your documents will still sync, but you will not see your PDFpen documents in iCloud Drive.

For iCloud Drive support upgrade to PDFpen for iPad and iPhone version 2 and PDFpen Scan+ 1.5 and later. We are working on adding iCloud Drive to PDFpen for Mac.

How do you access iCloud Drive documents on your Mac?

You’ve upgraded to Yosemite and iOS 8, you have turned on iCloud Drive, now you want to get at your PDFpen documents on your Mac, and maybe open a Preview PDF in PDFpen, or vice versa. Since we haven't implemented iCloud Drive, yet, you can't see your documents in the iCloud Drive folder, but you can still access them.

For our PDFpen/PDFpenPro for Mac users, there are two scenarios. 

  • You have PDFpen for Mac purchased from the Mac App Store. This means your  documents are stored in iCloud. In Finder you will not see PDFpen documents in the iCloud Drive folder but in the PDFpen folder under iCloud. This will allow you to open PDFpen documents in other apps, like Preview for example.When accessing documents from within the PDFpen app, edit documents stored in iCloud via the open/save dialog. This is how you can edit your PDFpen documents, or Preview PDFs.
     
  • You have the direct purchase version of PDFpen, not from the Mac App Store. If you also have PDFpen for iPhone or iPad, with iCloud turned on, that you have documents in iCloud. While the PDFpen documents in iCloud are currently hidden in iCloud Drive, they are still accessible on your Mac. To access the folder in Finder choose View > Go to Folder (Cmd+Shft+G) and paste in this location:

    ~/Library/Mobile Documents/7PKJ6G4DXL~com~smileonmymac~PDFpen/Documents

Keep in mind that if you update your devices to Yosemite or iOS 8, and you update to iCloud Drive when you do, those devices will no longer sync iCloud files with older operating systems. We explain this a bit more in our previous post iCloud, PDFpen and iOS 8 — Before you update.


Yosemite, TextExpander Helper, and Accessibility Permission

Philip Blog, TextExpander

After updating to Yosemite, some users are being prompted to grant access to TextExpander Helper in the Security & Privacy preferences of System Preferences, and they're finding TextExpander Helper isn't in the Accessibility list under the Privacy tab. This appears to be a bug in Yosemite's accessibility access preferences, and it affects other apps with helpers, such as Keyboard Maestro and Witch.

The workaround is to drag the TextExpander Helper app directly into the Accessibility list by following these instructions:

http://smle.us/tq91pq

It's possible that TextExpander Helper will not appear in the list after you've dragged it in, but behind the scenes your action has granted the permission to TextExpander Helper that it needs. Hopefully, OS X will return to displaying helper apps in a future update.

If you are one of the few cases where this doesn't work, we recommended rebuilding your Launch Services database using a tool such as Cocktail and restarting your Mac.

If, after following these steps, you still encounter trouble, please get in touch with our support team.


Letters in Circles Snippet Group

Philip Blog, TextExpander

Ⓛⓔⓣⓣⓔⓡⓢ ⓘⓝ Ⓒⓘⓡⓛⓔⓢ

Perhaps you’ve seen something like this on Twitter:

When I saw that, I thought: I can make a TextExpander group to make that really easy to do, and so…

To add the Letters in Circles group on a Mac:
1. Click the + button under the snippets list and choose “Add Group from URL…”
2. Enter this as the URL:   http://smle.us/circles
3. Press OK

To add the Letters in Circles group an iPhone or iPad:
1. Turn off “Ignore Case” in the settings, or you’ll be limited to capital letters in your circles
2. Tap the + button under the Groups list and choose “Add via URL”
3. Enter this as the URL:   http://smle.us/circles
4. Tap OK

To use the Letters in Circles group:
Type a lowercase o three times then the letter you want to be in the circle.

For example:

oooT gets you: Ⓣ
ooox gets you: ⓧ
ooo4 gets you: ④

(if ooox gets you Ⓧ on iOS, you probably have Ignore Case turned on in the settings)

Notes:
I chose triple o as the abbreviation prefix so that it’s easy to type on both OS X and iOS, and so that it’s easy to remember.

I included numerals 0-9, but I did not include 10-20. Although 10-20 in circles are available, they won’t work with my abbreviation scheme and expand immediately, and I doubt they’re used very often.

Ⓘ ⓗⓞⓟⓔ ⓨⓞⓤ ⓗⓐⓥⓔ ⓢⓞⓜⓔ ⓕⓤⓝ ⓦⓘⓣⓗ ⓣⓗⓘⓢ!